Wednesday, August 17, 2011

First Hard Cheese- Farmhouse Cheddar


After getting my cheese making in the kit from the New England Cheesemaking Supply Company I was anxious to try out a hard cheese.  The only problem is I have to be a little patient since hard cheeses take some time to age, some like Parmesan take 10 months!!!.  So for my first cheese I told Farmhouse Cheddar, mainly because I only have to let it age for 1 month.  I guess we will have to see if I can wait that long.

I first started with all the ingredients below.  The big red brick is the wax that I will melt to cover the cheese (I will blog about that later).  You can also see the mold I will be using to shape the cheese.  And then right in front of the milk in the square packet is the live culture that is the secret to getting the right taste. It is called mesophilic culture and is used for low heat cheeses.  This is all so very exciting.


Here is my ingredient list:

     2 Gallons Whole Milk
     1 packet direct-set mesophilic starter (or 4 ounces prepared mesophilic starter from New England Cheesemaking)
     1/2 teaspoon liquid rennet (or 1/2 rennet tablet) diluted in 1/4 cup unchlorinated water
     1 tablespoon cheese salt

I first put the 2 gallons into my new stainless steel pot and that into a bigger stainless steel pot with water in to create a double boiler.  I set the burner to level 2 and slowly warmed the milk up to 90 degrees.  The water on the in the outer pot was around 94 degrees. This took about 15 minutes.  I then added the culture and covered for 45 minutes.  This I was able to do by just removing it from the heat and it stayed at the 90 degrees.

After this I added the rennet and slowly stirred the diluted rennet into the milk.  I put in on the burner for a little bit to warm the water back up to 94 degrees then took it off again and let it sit for 45 more minutes.     
My double boiler

After letting the milk set for 45 minutes the curds had formed and I got a somewhat clean break.  I then had to cut the curds into 1/2 inch cubes I did this by taking a long knife and cutting the cheese one way with 1/2 inch between each cut I then rotate the pot 90 degrees and cut more lines 1/2 inch apart.  I then needed to cut he cheese underneath the surface so I just did not have very, very, very long cubes. To do this you angle the knife at a 45 degree angle and using the previous lines cut to make the 1/2 inch cubes.

Next I heated the curds slowly to 100 degrees (about 3 degrees every 5 minutes) I kept the burner between level 2 to level 3.  This is called cooking the curds, allows the whey to be released from the curds. 


At this point I scooped the cheese curds into a piece of cheese cloth and then hung it up off our cabinets for 1 hour to let all the whey drain out.
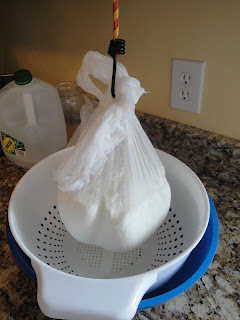
Do you like my little bungee cord
 Next you break the compressed cheese into walnut size pieces.  Here is the picture when I just started breaking up the cheese


Here is a picture after I was done breaking up the cheese.  I then added the salt and mixed it around.  At this time I could already tell it was different from the soft cheeses I have already made by just the smell of the curds.  


Since I do not have an actual press, I hope I will eventually have one, I had to make one.  I did this by putting a little custard dish upside down into a pie plate and set the mold on top of the custard dish, this allows the whey to drain without keeping the bottom of the mold wet. 


Here you can see the mold entirely filled ot the rim with the curds. You can also see the whey already begining to drain.

TO press I first needed to out 10 pounds for 10 minutes.  For my improved press I used two bricks in a big tuppaware container. Then I took the cheese out (that was lined with cheesecloth) and flipped it.  Then I had to put 20 pounds for 10 more minutes.  This took 4 brick and again flipping the cheese


After that I needed to do 50 pounds for 12 hours.  Since I was worried about the 10 bricks falling over and put my whole made up press into my big pot that kept everything from falling.


After waiting overnight this is what it looked like.

 Now I just need to wait 3-5 days as it airs out.  I also cut the block in half that way I can try one half after the required 1 month of aging, and then let the other one age longer.  Tomorrow I plan to wax the two halves and letting age downstairs in a little fridge at around 50 degrees.  Today, after it has sat for 3 days, it already has a very nice cheese aroma.


Also below you can see I was able to make a decent amount of ricotta from the left over whey.  About 2 cups.  So out of 2 Gallons of whole milk I was able to get about 2 pounds of Farmhouse Cheddar and about 2 cups of Ricotta.


 I can not wait to try my cheese it a mere 4 weeks.  Right now it is a little hard since it is in view but once it goes downstairs it will be much easier.  I plan to make real cheddar and parmeson during the month of September.  Stay tuned.


Monday, August 15, 2011

Patience is a Virtue

Cheese Glorious Cheese, What Else Could I Ask For

So since that last time I wrote I have tried making mozzarella several times.  Each time it seemed to fail.  The curds never got firm and when I put it in the microwave it would come out way to runny.  The first time I thought it was because I had used to little rennet, since my wife had said the last mozzarella was too firm, the next time I thought it was because I used the wrong brand of milk, the third time it was a different brand of milk.  Finally I decided it was because my wife was not in the room with me.  When I made the mozzarella from the previous post she was there telling me to be patient, let the curds set a little longer, let the whey drain a little more.  Well she told me the same things again.  After scooping out the curds I again felt that the cheese was to runny and I was about to give up, but she kept telling me to be patient, to endure to the end, and so I did.  And I got some good cheese out of it.  Here are some pictures from the successful cheese making.

 
After cutting the curds into 1/2 inch cubes

Draining the whey out of the cheese, this is the part
that my wife had to tell me to be patient, I thought it was all wrong

This is me kneading the cheese, I wear the rubber gloves to
protect my hands from the cheese, its about 130 degrees

The fun part, pulling the cheese like taffy

Pulling the mozzarella into a ball

the ball of mozzarella


So as you can see it pays to have your wife tell you what to do.  Had it just been me in the kitchen I would have given up, I still think that the first time I got it to work, the curds were a little firmer.  But don't tell my wife I think that I am right. 

We ended up snacking on most of the cheese but last night I made manicotti.  The recipe I used called for three cheeses and guess what? Two of the cheeses I used were homemade cheeses.  The Ricotta and the Mozzarella.  I only had to use store bought Parmesan.  Next year I hope to be able to make manicotti and use ONLY homemade cheese.


Also this past week in the mail I got this little package.  YIPPEE.  It is from the Queen of Cheese (you can access her website from a link on the right).  The kit came with some cultures so I can make some different cheeses, some molds, some cheese wax, and a few other things I will need.  I was really excited.


Check out my post that is comming in the next few days to see my first attempt at making a hard cheese, a Farmhouse Cheddar in fact.

Sunday, August 7, 2011

3rd Time is The Charm-Mozarrella


Last Sunday, after running to the store Saturday night to get more whole milk from a local dairy and not Kroger, I made some more mozzarella. 

The ingredients I used are as follows:
  • 1 Gallon Trauth Farms Dairy Whole Milk
  • 1 1/2 tsp Citric Acid diluted in 1 Cup cool water
  • 1/4 tsp Rennet diluted in 1/4 cup cool water
  • 1 tsp canning salt

I first heated the citric acid and 1 gallon milk to 90 degrees  (this took about 15 minutes), I then took the milk off the burner and I gently stirred in the diluted rennet. 

After this I covered the warm milk and let it sit for about 10 minutes.  The curds and the whey separated much more than the last time I did this.  At this point I was able to make a clean break.  I then cut the curds into about 1 inch cubes with a long knife.

Next I heated the curds to 105 degrees while gently stirring every once in awhile.  Once it reached 105 I took it off the burner and began scooping the thick curds out with a slotted spoon into a colander.  Using my rubber gloves I drained as much whey out as possible before putting it into a microwave safe glass bowl.  Jenelle was amazed of how the curds kept leaking whey.

I then put it into the microwave for 1 minute taking it out and kneading the cheese.  I then nuked it for 35 seconds and kneaded again (I did this step a total of three times).  Draining the whey each time.

The next part was fun, I started stretching the cheese like taffy, it was really stretchy as you can see.  At this time I also added the salt.  After stretching it till it got a little shiny I made the mozzarella into a little ball.

It tasted really good, though Jenelle thought it was too firm for Fresh Mozzarella..  Here is a picture of the final product.


I tried to make some ricotta from the whey but I got some much curds for the mozzarella that there really was not much left for ricotta.

We ate the cheese with some tomatoes and also used it on some pizza later in the week (see below)


I will hopefully be ordering some cultures soon so I can start making different cheeses, the only problem is that I will not know if I was successful until months later after I have let the cheese age.